Jazz Hands intensifies
Up until now, this series has been focusing on pfSense, but there’s more to a homelab than a router. I know, controversial.
Disclaimer: this is not going to be an in-depth guide. I’m only hoping to tickle your tastebuds in the hope it motivates you, dear reader, into learning something new. Drop a comment or hit me up on Reddit if you want something more detailed.
Con-tain-er-ise #
Another trend, another buzzword, another paradigm shift. Yeah, but containers are an absolute gem for the homelabber who wants to play around with the newest virtual toy.
As I touched on in Part 1, I have a QNAP NAS (TVS-663) that’s been the backbone of my homelab for the last two years. Crucially, the QNAP ecosystem includes a Container Station application. While this is an easy way to get containers up and running for a novice, there’s a couple of caveats that, over time, have proven themselves incredibly annoying:
- The containers always, always, use the QNAP for their DNS, and it often fails to resolve.
- Loading up the Container Station is a slow process, and there’s seemingly no way to speed it up.
- There’s no way to mount individual files to a container.
- There’s no way to change existing containers beyond simple things like CPU or RAM limits. They must be deleted and re-created by hand.
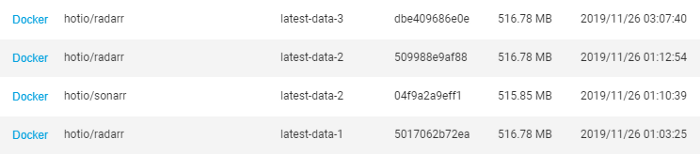
- Pulling the “latest” tag for a container is… weird. It doesn’t update the local “latest” tag with the correct revision; instead, for every updated “latest” tag, QNAP creates a “latest-data-x” tag - cos that’s helpful!
Docker Compose to the rescue #
So why didn’t I just use Docker Compose straight away? Well, the convenience factor of the Container Station and the lack of knowledge on the underlying container management layer was enough of a deterrent. I’m also lazy. But with the aforementioned shitlist, I decided to re-initialise my containers via Docker Compose.
Compose lets me rapidly change my containers. Edit the file, execute docker-compose up -d, and the change is done. No more messing around with capturing settings in screenshots and notepad then deleting, re-creating, figuring out I used the wrong “latest” tag, deleting again, gnashing of teeth, etc. etc.
version: "2"

services:
  lidarr:
    image: "hotio/lidarr:netcore"
    container_name: "selby-lidarr01"
    restart: always
    environment:
      TZ: "Australia/Melbourne"
      UMASK: "022"
      PGID: 1000
      PUID: 1000
      DEBUG: "yes"
      ARGS: ""
    volumes:
      - "/share/Container/selby-lidarr01/config:/config:rw"
      - "/share/Download:/download:rw"
      - "/share/Music:/music:rw"
      - "/share/Container/resolv.conf:/etc/resolv.conf:ro"
    ports:
      - "8686:8686"
    dns:
      - 192.168.178.50
      - 192.168.178.1
      - 1.1.1.1
      - 1.0.0.1
      - 8.8.8.8
      - 8.8.4.4
    labels:
      - "traefik.enable=true"
      - "traefik.http.routers.to-lidarr.rule=Host(`lol-not-my-real-fqdn`)"
      - "traefik.http.routers.to-lidarr.tls.certresolver=le"
      - "traefik.http.routers.to-lidarr.tls.domains[0].main=lol-not-my-real-fqdn"
      - "traefik.docker.network=traefik_default"
      - "traefik.http.services.lidarr.loadbalancer.server.port=8686"
    networks:
      - traefik_default
    mem_limit: 750m

networks:
  traefik_default:
    external: true
But wait, what’s this? Traefik? #
Ah yes, the "smart"section of Part 4. Well, Traefik is a reverse proxy service that dynamically discovers the services to proxy (via Docker labels), handles the HTTPS certs via LetsEncrypt, offers middleware such as authentication, HTTP to HTTPS redirects, and much more. They call this dynamic discovery of services…Service Discovery. Original, yeah?
Through the magic of Traefik I can, should I choose to do so, publish new containers to the outside world, or even just internally.
Prerequisites #
Yeah, the fine print. This configuration assumes:
- You have a valid domain name, with the apex or subdomain wildcard resolving to your homelab public IP.
- You’re using LetsEncrypt for certs (Traefik automates all of this).
- A firewall and/or NAT rule exists to allow/forward traffic on ports 80 and 443 to Traefik.
Do the thing and make it go #
Traefik is a container (inception!), so for it to run it needs access to the Docker socket.
version: "3.3"

services:
  traefik:
    image: "traefik:latest"
    container_name: "selby-traefik01"
    restart: always
    environment:
      - TZ=Australia/Melbourne
      - [email protected]
      - CF_DNS_API_TOKEN=albatros
      - CF_ZONE_API_TOKEN=get-your-albatross
      - [email protected]
    command:
      #- "--log.level=DEBUG"
      - "--api.insecure=true"
      - "--providers.docker=true"
      - "--providers.docker.exposedbydefault=false"
      - "--entrypoints.web.address=:80"
    volumes:
      - "/var/run/docker.sock:/var/run/docker.sock:ro"
      - "/share/Container/resolv.conf:/etc/resolv.conf:ro"
      - "/share/Container/traefik/config/traefik.toml:/etc/traefik/traefik.toml:rw"
      - "/share/Container/traefik/config/acme.json:/etc/traefik/acme.json:rw"
      - "/share/Container/traefik/config/acme.cloudflare.json:/etc/traefik/acme.cloudflare.json:rw"
      - "/share/Container/traefik/log:/etc/traefik/log:rw"
      - "/share/Container/traefik/providers/file:/etc/traefik/providers/file:rw"
    networks:
      default:
        ipv4_address: 192.168.178.37
      traefik_default:
      consul:
networks:
  default:
    external:
      name: qnet-static-eth0-b03c93
  traefik_default:
    external: true
  consul:
    external:
      name: another-docker-network
Eagle-eyed viewers will spot a funky “qnap” network adapter towards the bottom - this is the QNAP bridged (aka macvlan) adapter that Container Station configures for us. This lets us assign discrete IPs to our containers, rather than just port forwarding as the previous example did. Config sample available on Github.
Before we can spin up the container using docker-compose up -d, we need to give it a basic configuration. Lucky for you, I’ve prepared a sample one - https://gist.github.com/michaelgreenhill/bff6271b9ed88d528ffdf75b3a27bd1e#file-traefik-toml
The important lines to worry about are:
- Line 21 - recommend to remove or comment this out. This allows Traefik to reverse proxy to a backend HTTPS server with a self-signed certificate.
- Line 35 - make sure you put a valid email address in, otherwise you may miss out on certificate expiry notices.
- Line 36 - make sure this path is stored outside of the container, otherwise, the certificate store will be wiped every time the Traefik container is rebuilt.
- Line 137 - this should map to your Docker socket. Without this, Traefik won’t auto-discover Docker containers to reverse proxy.
- Line 140 - set your publicly-resolvable domain name.
Once you’ve customised your docker-compose.yml and traefik.toml files to suit your environment, launch it via docker-compose up -d, then it’s time to proxy your containers. Using my config example, this can be accomplished in one of two ways:
- Adding labels to the Docker containers you wish to reverse proxy
- Manually creating a configuration file for that service
There are, of course, other ways to configure your containers for reverse proxying but for now, let’s focus on these two methods.
Slapping on a label #
This is the easiest way to go about reverse proxying your containers. Assuming you’re already using Docker Compose, it’s a simple matter of adding a few lines to your compose file and relaunching it.

This is a real-world example from my Lidarr app, with the domain name obfuscated for reasons. Dissecting it, we have a few key points to worry about:
- Line 28 - The port that the container uses internally needs to match up with the Traefik label on line 36
Note: this is the internal port, not the port that you publish on. If your app runs on port 80 but you expose it to your network on port 8080, then use port 80 on line 36 - Line 30 - Enable the proxying of this container
- Line 31 - Set this to your publicly-resolvable domain name
- Line 38 - Take note of the network you attach to this container. Traefik must also be attached to this network for it to reverse-proxy this container.
Doing it old-school (file-based) #
If you don’t want to recreate your container to apply the label, or perhaps you’re not reverse proxying a container at all, you can use file discovery. In my traefik.toml example I’ve included a directory that Traefik will watch for any changes, and because it’s mighty clever it’ll automatically apply these changes.
As you can see there’s not much to it. Unlike the label-based example above, this doesn’t make use of an alternate name (SANS) for the HTTPS certificate, but it’s definitely possible to do so via file discovery.
So why would I bother with containers? #
I dunno, cos learning is fun? But beyond the mental exercise, there are some legitimate use cases for the home labber:
- Unifi controller, to centrally manage your Ubiquiti access points and switches
- Lancache - a local cache for all things Steam, Ubisoft, etc. Great if you’re having a LAN party and want to offset the obscene hit to your internet when half a dozen people download the same 100gb game
- Pihole - for blocking ads, malware, gambling, porn, etc.
- qBittorrent, Radarr, Sonarr, Lidarr, Jackett - download torrents, manage your movies, TV shows, music, and torrent indexing
- HomeAssistant - automate everything
- A private Minecraft server
- MySQL/MariaDB/etc
- Prometheus/Grafana monitoring and visualisation
- Graylog for observability
Plenty to be going on with, yeah?
Glossary #
- Containerisation - running self-contained, stateless applications in a preconfigured environment
https://www.docker.com/resources/what-container - Docker - an implementation of the containerisation concept
https://en.wikipedia.org/wiki/Docker_(software) - Mount - expose a file or a folder on the local filesystem to a Docker container
https://4sysops.com/archives/introduction-to-docker-bind-mounts-and-volumes/ - Pulling - fetch a copy of the Docker container from the registry, typically Docker Hub
https://docs.docker.com/engine/reference/commandline/pull/ - Docker Compose - a prescribed way of creating and updating containers from a configuration file
https://docs.docker.com/compose/ - Reverse proxy - retrieve resources from a backend server on behalf of a client
https://en.wikipedia.org/wiki/Reverse_proxy - Service discovery - automatic detection of devices and services offered by these devices on a network
https://www.nginx.com/blog/service-discovery-in-a-microservices-architecture/ - Apex - the root of a domain, for example, medium.com vs www.medium.com
https://news.ycombinator.com/item?id=8825519 - macvlan - the ability to assign a MAC address to a container, making it appear as a standalone device on the network
https://docs.docker.com/network/